Onboarding & rollout playbook
This is the hands-on guide for getting a campus from “signed up” to “live at the gate.” It walks the operator-console onboarding workflow, the per-campus go-live checklist, roster import, and channel activation — in the order you actually do them.
Read this first — the honest shape of rollout today:
- Onboarding is one campus at a time. There is no bulk “import 30 schools” flow yet (Roadmap). For a group you repeat the campus loop below per site — each takes minutes, but they are sequential.
- The operator role is Cybertron platform staff: it sees every school on the platform. There is no group-scoped owner login that shows only your campuses yet (Roadmap). Plan for Cybertron to drive onboarding with you, not for a self-service owner console.
- All onboarding and demos happen on UAT. Production is currently a hollow shell with no secrets — do not point a live campus at production until it is provisioned.
Everything below is shipped and verified live unless explicitly marked Roadmap.
The per-campus loop at a glance
| Step | Where | Owner | Outcome |
|---|---|---|---|
| 1. Provision the campus | Operator console → Onboard school | Operator | School + first admin (+ optional officer) created via durable workflow |
| 2. Import the learner roster | Admin → Imports | School admin | Learners, guardians, badges, classes loaded |
| 3. Issue badges & confirm photo key | Admin | School admin | NFC tags mapped; per-school photo encryption key ready |
| 4. Add staff (officers, class teachers) | Admin → Staff | School admin | Gate + class coverage |
| 5. Connect channels | Operator + Admin → Settings | Operator + admin | Email live; WhatsApp/SMS/push as provisioned |
| 6. Work the go-live checklist to all-green | Admin dashboard | School admin | Campus ready to open the gate |
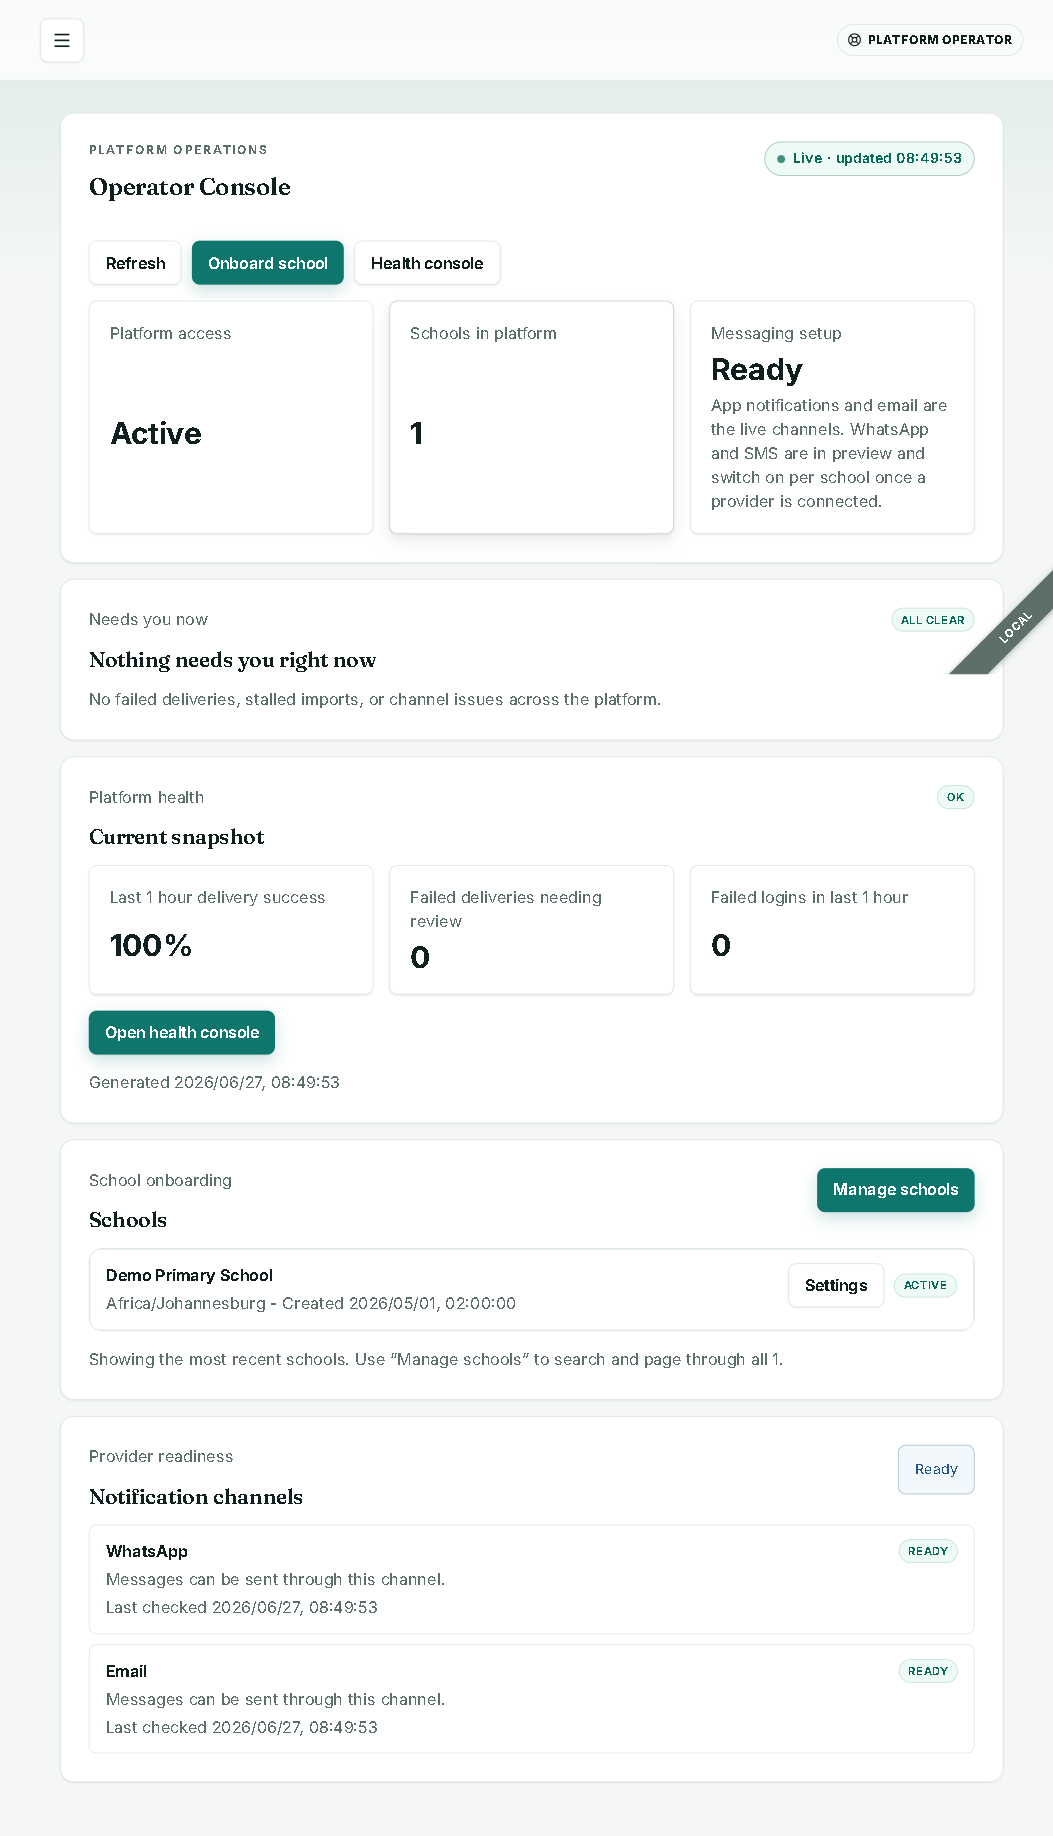
Step 1 — Onboard a campus (durable workflow)
From the operator console, choose Onboard school.
Fill in the onboarding form (/operator/schools/new):
- School name
- Timezone — defaults to Johannesburg; pan-African and global options are available
- Campus close time
- First admin — name, email, temp password (leave blank to auto-generate)
- First officer — name, email, temp password (optional)
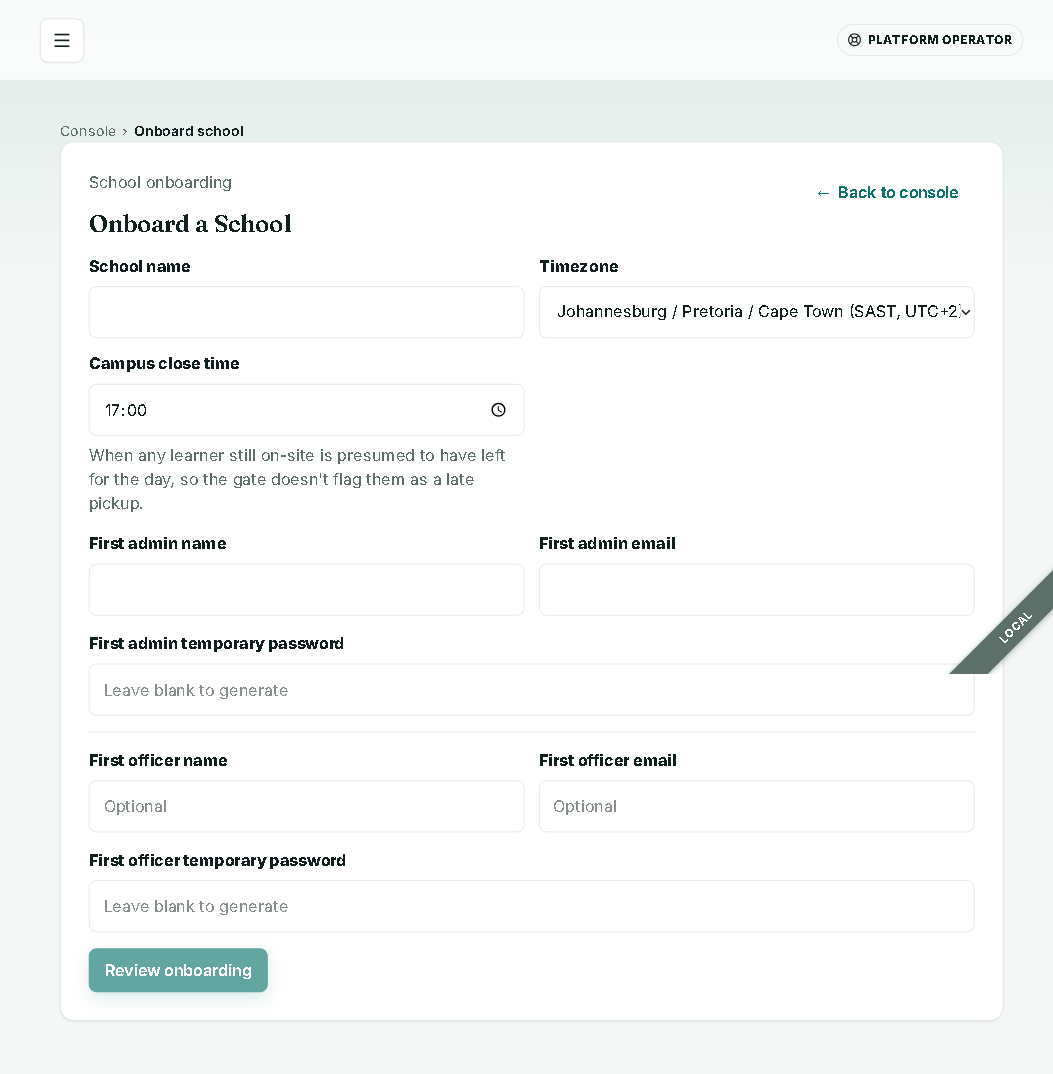
Choose Review onboarding to get a review-before-commit panel — confirm every value here, because provisioning runs for real once you proceed.
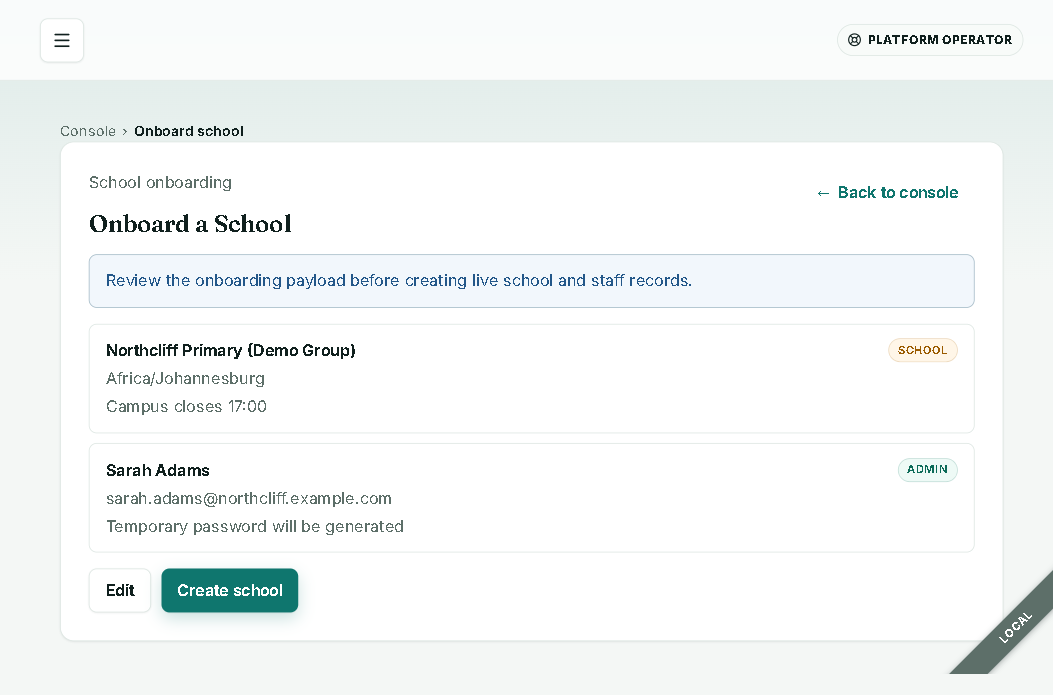
Choose Create school. A durable Cloudflare Workflow now runs and the steps tick green live:
- Create the school ✓
- Create the admin account
- School provisioned
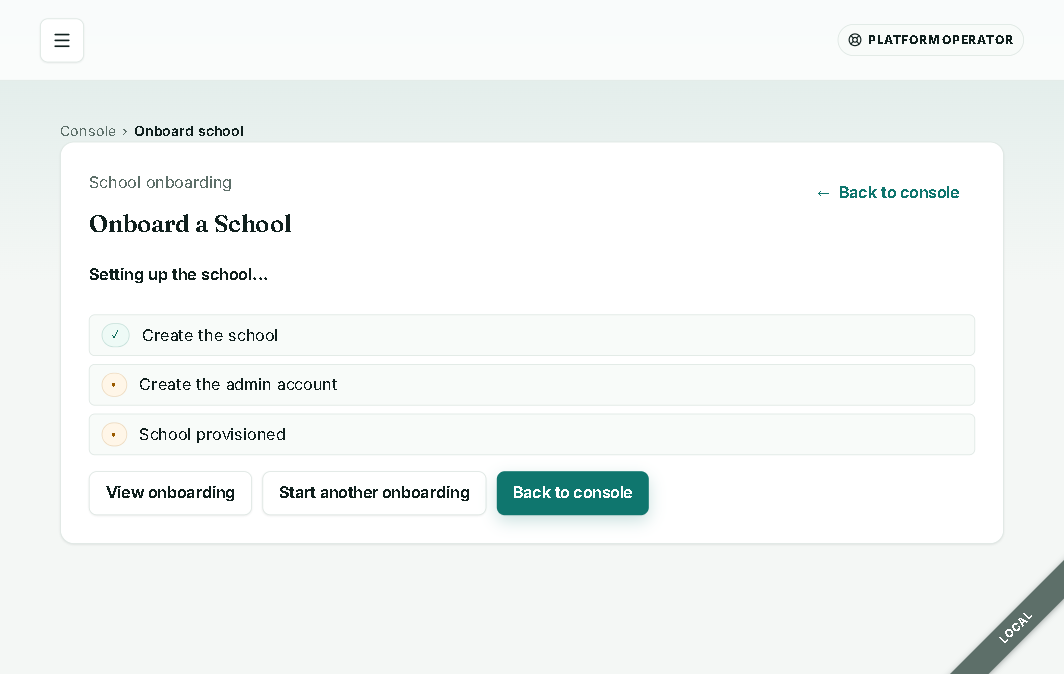
The workflow is idempotent with per-step retry/backoff, so a transient hiccup resumes rather than half-creating a campus. When it completes, choose View onboarding to track the new school, or Start another onboarding for the next campus. The school now appears in the operator Schools list, where you can filter All / Active / Pending / Disabled and open per-school Overview / View onboarding / View progress / Support / Settings / Imports / Suspend.

The workflow also schedules onboarding drip emails and a day-30 go-live evaluation — keep working the checklist below so that evaluation lands green.
Step 2 — Import the learner roster
The school admin imports learners, guardians, badges, and classes from a CSV. Import is a two-phase, preview-then-commit flow — nothing is written until you commit.
- Upload the CSV (or paste). Files are capped at 25 MB; the file is hashed (SHA-256) for an auditable record.
- Preview — every row is validated and column mappings are suggested. You get
total / valid / invalidcounts plus row-level reasons. - Review and fix — correct rows inline, then re-preview.
- Commit — choose a commit mode:
- All-or-nothing — commit only if every row is valid.
- Skip errors — commit the valid rows, leave the invalid ones.
- Two-phase — stage then finalise, with a rollback window.
What validation catches
The preview flags rows by reason, including: missing learner name, missing NFC badge id, missing guardian name or contact, duplicate NFC or guardian within the file, NFC already exists in the school, invalid email or phone, and a suggested class link. Spreadsheet formula injection is neutralised automatically. Guardian contact details are stored sealed-and-hashed (POPIA-aligned encryption at rest).
Large-file caveat (important)
For a smooth import, split rosters above ~1,600 rows into batches of roughly 1,500 and import them in sequence. The validate-and-commit pass on a very large single file can run long; batching keeps each preview snappy and each commit cleanly auditable. Lifting this so a single large file streams in one pass is Roadmap. The 25 MB hard limit is separate and unchanged.
Tip: import classes first (or in the combined file) so learners link to a class on the way in, which makes the class roll-up and class-teacher views populate immediately.
Step 3 — Badges and the photo encryption key
- Badges — map each learner to their NFC tag (via the roster import’s NFC column, or per learner). The go-live checklist treats badges as ready at 80% of active learners issued.
- Photo encryption key — each campus uses its own AES-GCM key for learner photos. The checklist’s Photo encryption key ready item confirms a key is provisioned before any photos are stored. No key, no photo storage — by design.
Step 4 — Add staff
Under Admin → Staff, add the people who run the gate and the classrooms:
- Officers — gate scanning on a phone.
- Class teachers — class roster, daily roll, and pickup approvals, scoped only to their assigned classes. (Reassignments are admin-only.)
The checklist treats staff as ready at 3 or more active staff members. When admins enrol a passkey, sensitive admin actions then require passkey step-up — expect that prompt and keep a recovery path.
Step 5 — Activate notification channels
Guardians are notified push-first: web push → email → WhatsApp → SMS. Channels demote honestly — if a channel is not connected, the UI shows a Preview badge and the system silently falls back to email rather than faking a “sent.” Activate them per environment:
| Channel | What it needs | Status |
|---|---|---|
| Verified sending domain (SPF/DKIM/DMARC) for the branded layout | Live channel; the dependable baseline | |
| Web push | VAPID keypair as secrets on notification-service + the matching gateway key, then real-device delivery proof | Real + RFC-8291-proven in code; needs per-environment provisioning |
| Meta Business number + template approval, then connect per school in Settings | Preview / provider-gated; demotes to email until connected | |
| SMS | Operator-provisioned provider credentials per school | Preview / provider-gated |
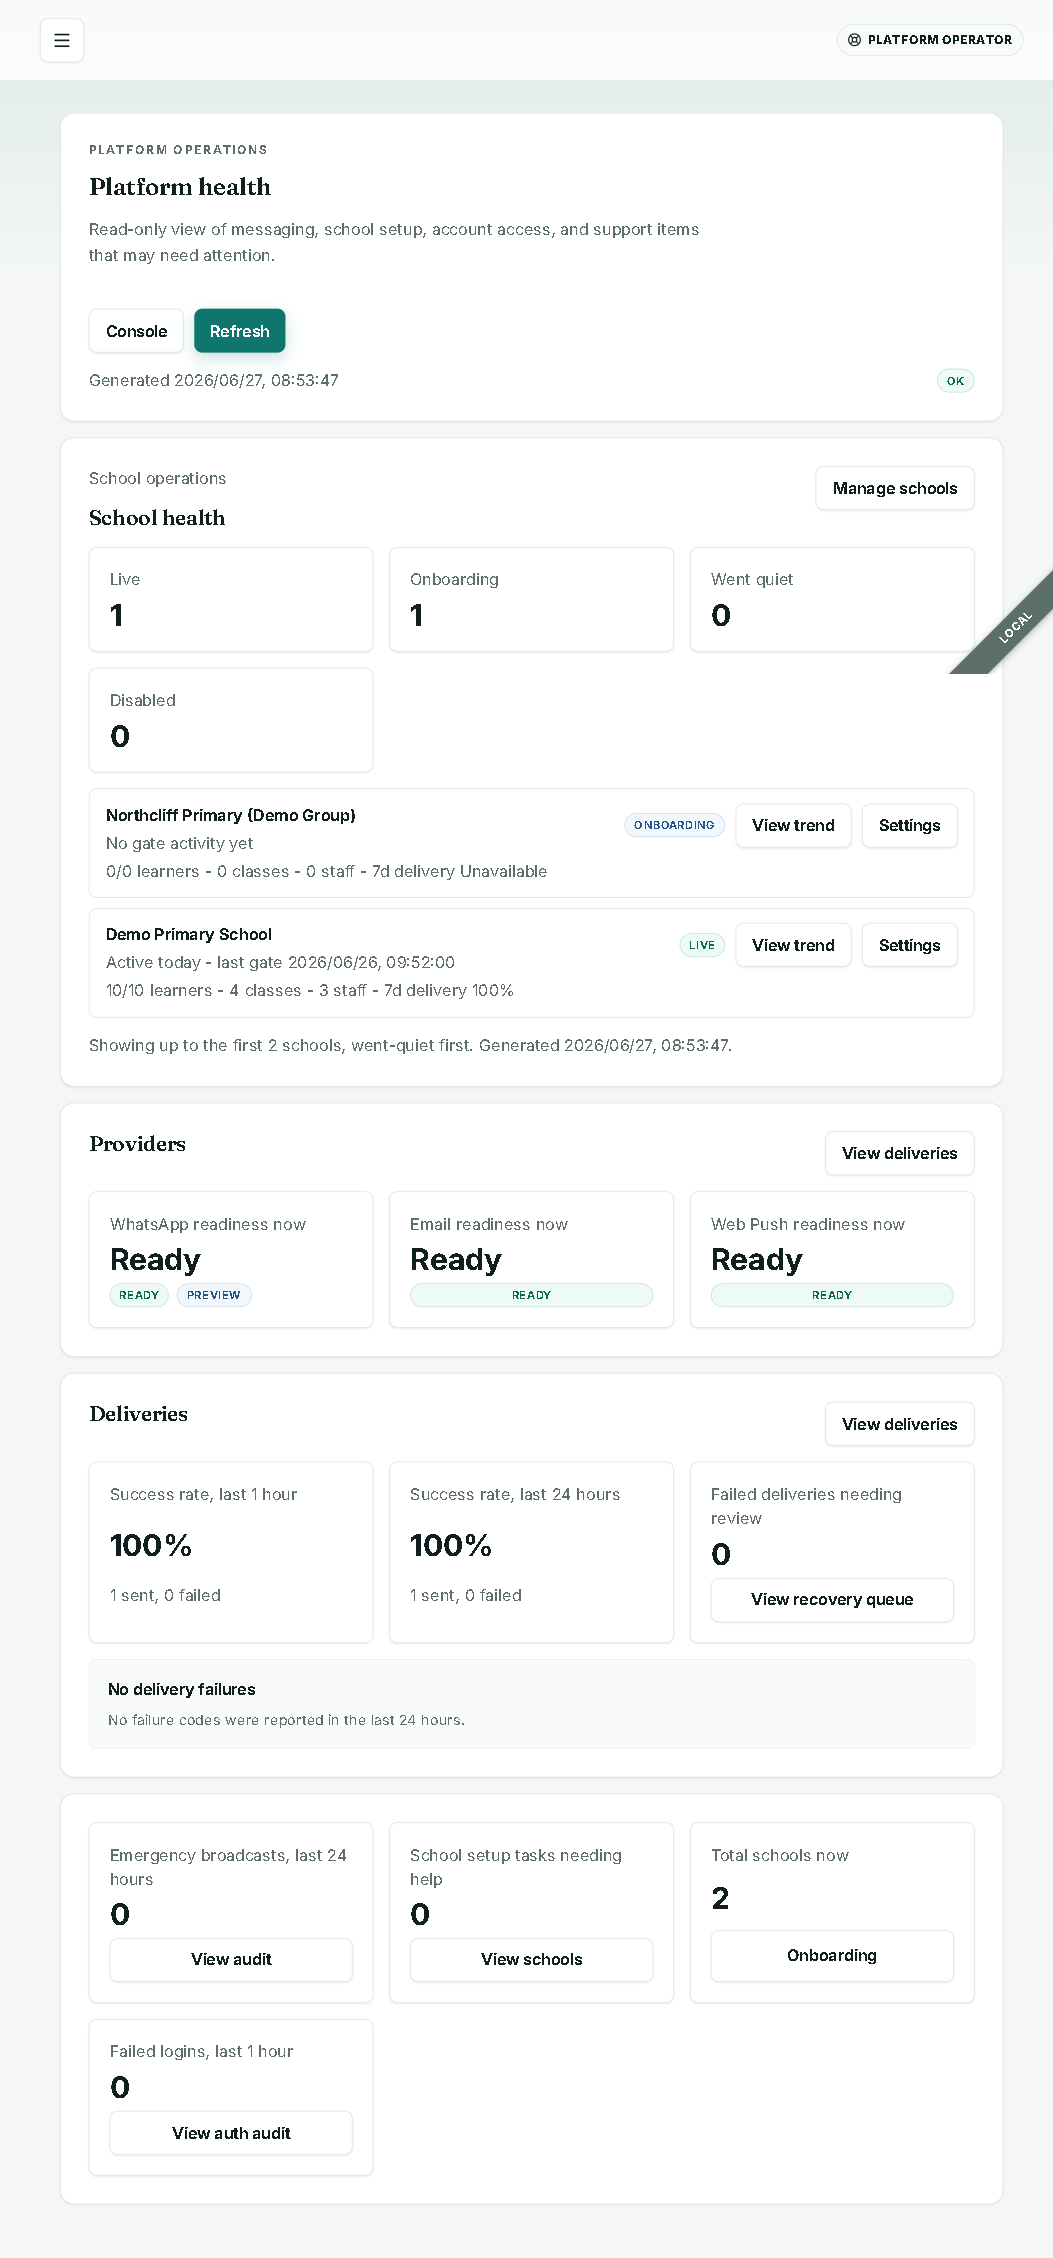
Operator-side, the console’s Messaging setup card and Provider readiness (WhatsApp / Email) show what is connected. School-side, Admin → Settings → SMS channel and the WhatsApp configuration carry the per-school keys. Until a number is connected, the admin go-live checklist correctly reads “WhatsApp not connected yet [Preview].”
Two more provisioning notes:
- Web push is the headline parent channel — do not claim it end-to-end until you have seen a notification arrive on a real Android device for that environment.
- Branded PDF / SAR rendering needs the Cloudflare Browser Rendering binding; without it, documents render title-only. Confirm the binding before promising branded reports.
Step 6 — Drive the go-live checklist to all-green
The admin dashboard shows a live Go-live checklist computed on every load — there is no stale snapshot. All six must be ready before opening the gate:
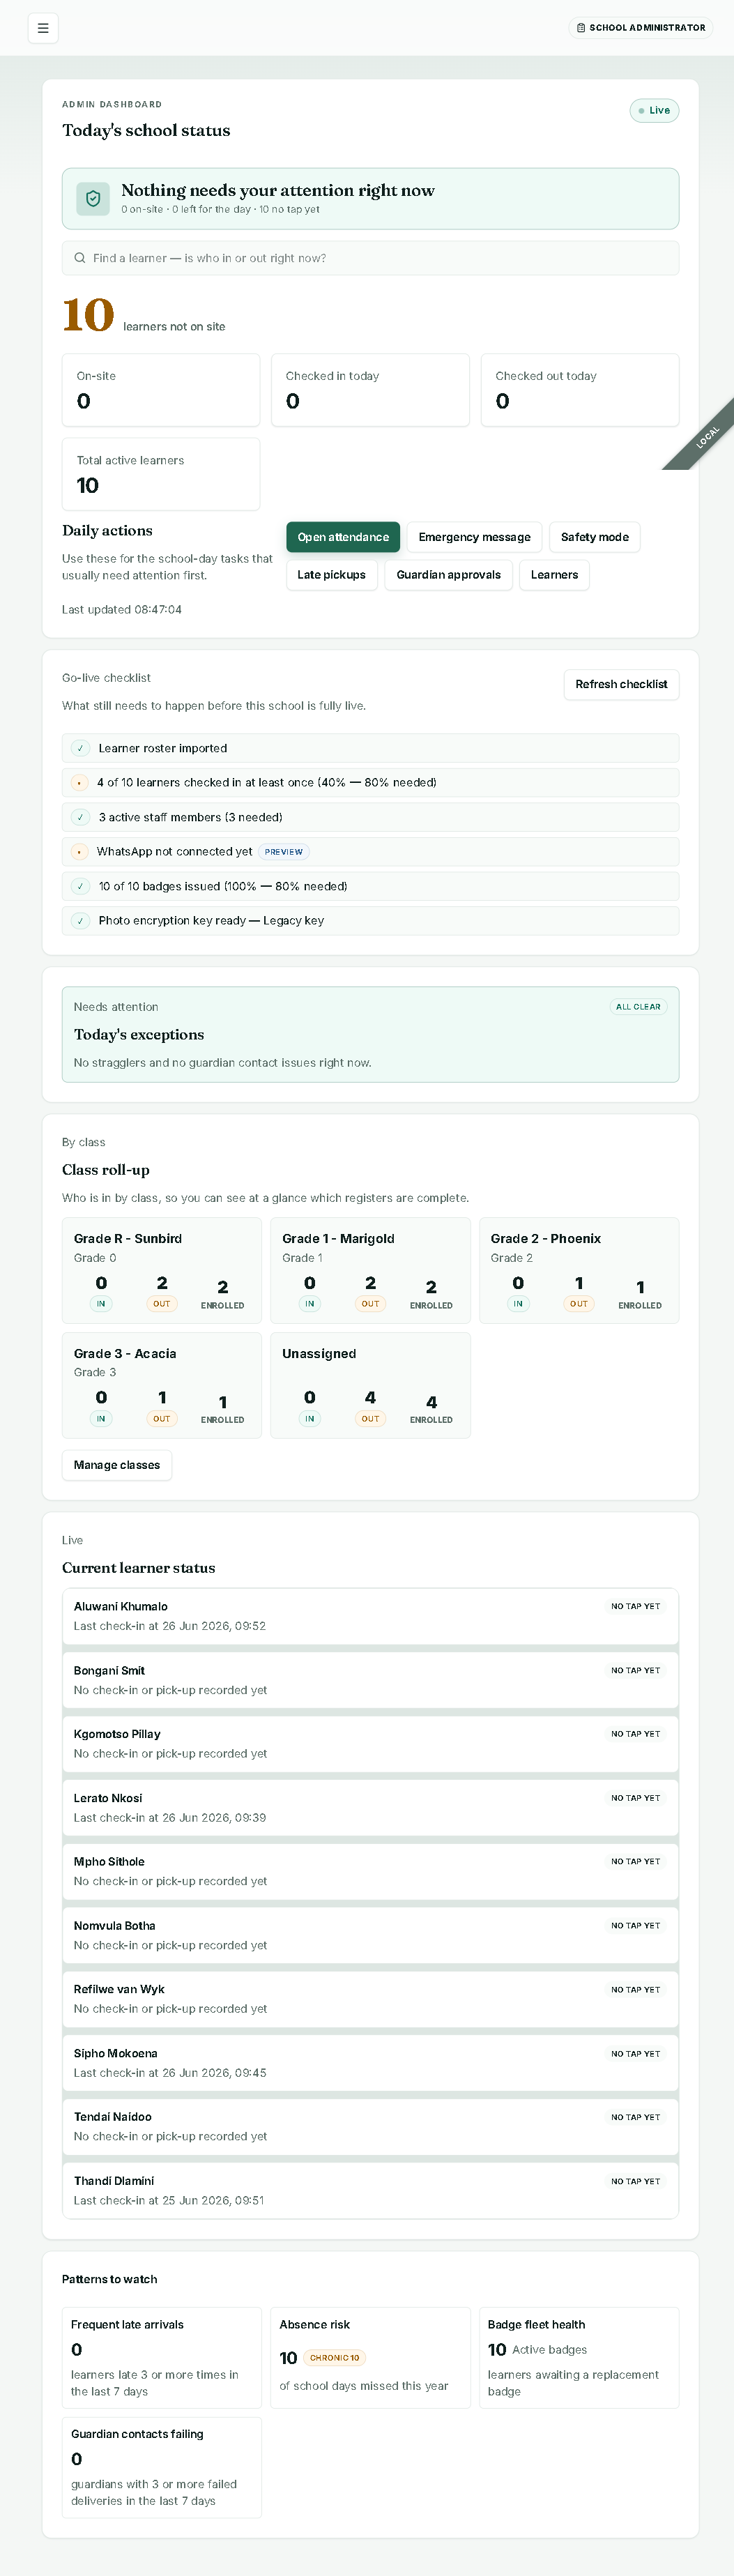
| Checklist item | Ready when |
|---|---|
| Learner roster imported | At least one active learner exists |
| Learners checked in (X of Y) | ≥ 80% of active learners have ever been scanned |
| Active staff members | ≥ 3 active staff |
| WhatsApp connected | A provider number is configured (else “not connected yet [Preview]“) |
| Badges issued | ≥ 80% of active learners have an active badge |
| Photo encryption key ready | A per-school photo key is provisioned |
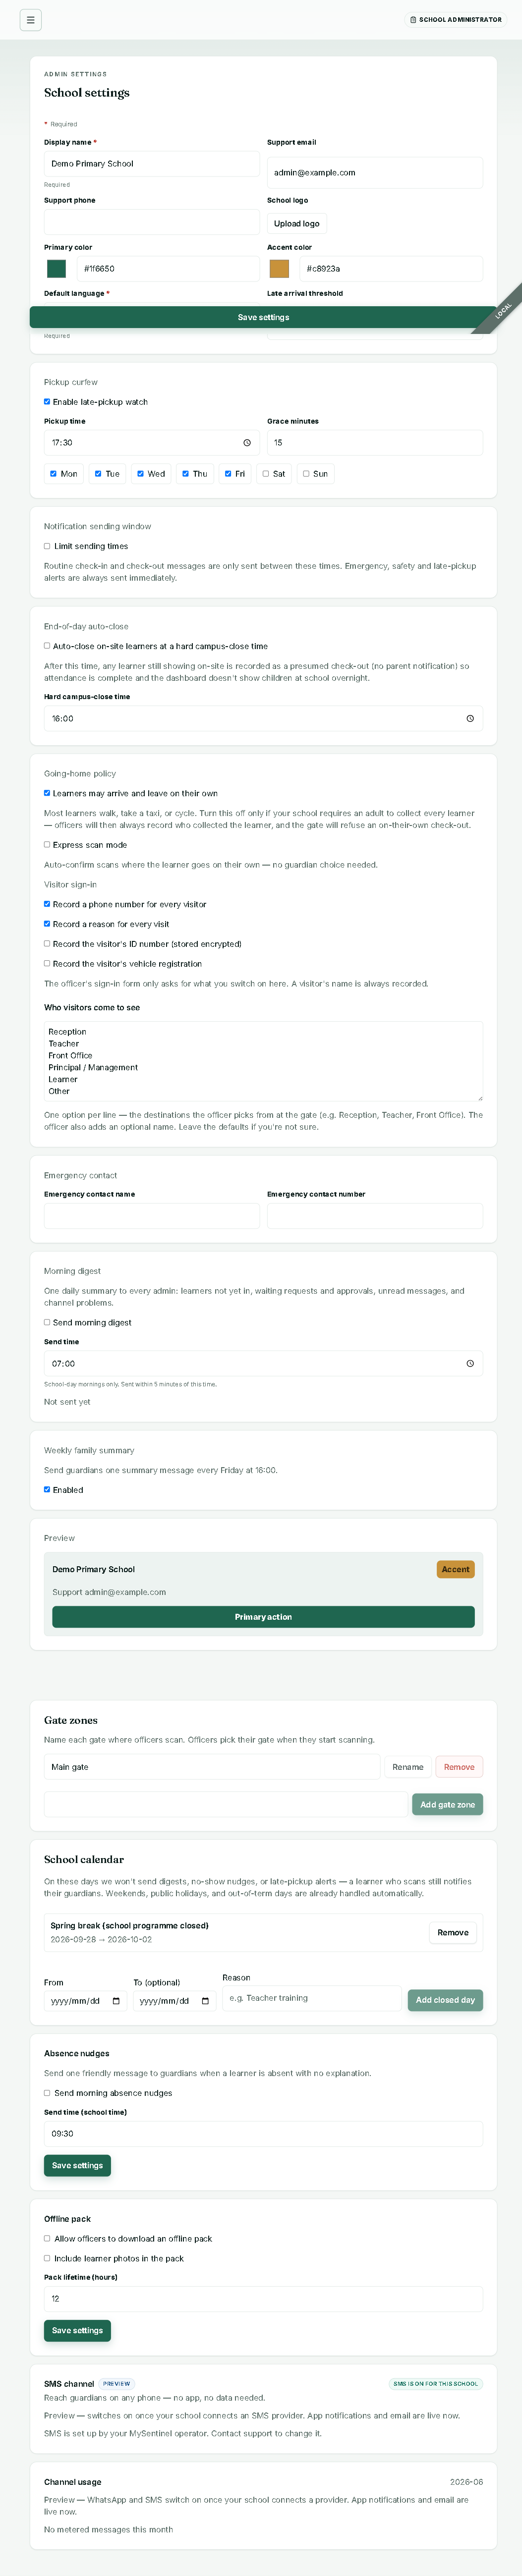
Per-campus branding and policy live in Admin → Settings: display name, support email/phone, logo, primary colour (#1f6650) and accent (#c8923a), default language (English / Afrikaans / isiZulu), late-arrival threshold, pickup curfew, quiet-hours sending window, end-of-day auto-close, going-home policy and express scan mode, visitor sign-in fields and destinations, gate zones, and the school calendar.
When the checklist is all-green, the officer can open the gate.
Rolling out across a group
Because onboarding is per-campus today, sequence the group like this:
- Pilot 2–3 campuses through the full loop above so the operator console, platform-health view, and cross-school counts have real data behind them.
- Repeat per remaining campus — each onboarding is a few minutes of form-plus-workflow, plus the roster/staff/channel work.
- Watch platform health in the operator console (last-hour delivery success, failed deliveries needing review, failed logins) as each campus comes online.
Roadmap (state plainly to stakeholders)
- Bulk / multi-campus onboarding in one action — not yet; one campus at a time today.
- Group-scoped owner role (a login that shows only your campuses) — not yet; operator = full platform staff.
- Single-pass large-file import above ~1,600 rows — batch for now.
- Physical per-campus database isolation — shard-ready, but only one shard is live; isolation today is logical (by
school_id), enforced in code. - Consolidated cross-campus academic report — not yet; channel-usage and billing aggregates exist today.
Name these plainly during rollout. The product’s channel-and-environment honesty is a feature — carry that same honesty into the rollout conversation and it builds trust rather than eroding it.